Why community automation helps you be your best (and most human) self
Stop me if you’ve heard this one before:
You worked hard to turn an idea into a brand.
You put yourself out there to share that brand with the world, connecting with people who resonated with your message.
You grew new followers and fans who genuinely cared about what you were building. And then something amazing happened: those followers became a real community.
The best part? You get to nurture and guide that community as it grows.
The less fun part is the amount of manual admin work that’s required once you’ve achieved that big, impressive milestone. It can add a layer of bittersweet anxiety to an otherwise celebratory moment.
And it happens more often than you’d think. But, two things can be true at once:
- Your community can’t be put on autopilot if you want it to keep engagement high and growth up and to the right, and
- You don’t have enough time to manually manage every aspect of your community (particularly as it scales).
The answer isn’t “hustle harder,” or anything related to bootstraps.
It’s community automation—careful, thoughtful, human-centric community automation.
Circle expert Stephen Maddison knows a thing or two about that: He’s been building community automation systems for over seven years for his Automate Community and throughout his personal life.
What is ‘community automation’?
Community automation is simply about creating systems where one action triggers multiple responses.
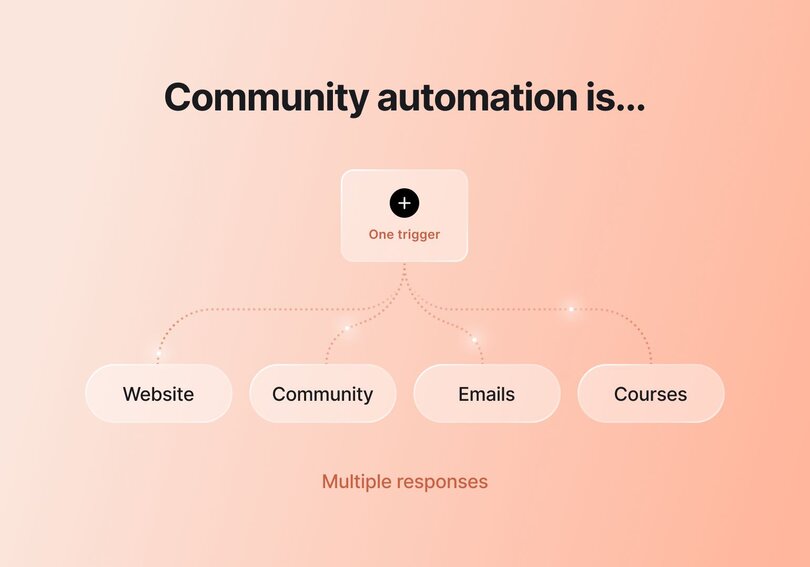
“When you do something, multiple actions will happen,” Stephen says. “If I click a signup link, an automation sends me an email and closes the original tab.”
That’s it! But there are some common pitfalls to avoid, and Stephen has seen them all—which have given him enough experience to know what works (and more importantly, what doesn’t).
It’s why he created the Automation Experience Map—to help you find a starting point for your automation journey—and shared it with the Circle customer community in a private masterclass.
Now, we’re taking the biggest insights from that masterclass and sharing them with you. By the end of this article, you’ll learn:
- How to find the best points in your member journey to automate
- What your member’s actions (and your tasks) have to do with automation
- The 3 foundational automations every community should have
Think strategy before software
Many of us have a tool-first approach to problem-solving, and we don’t even realize it. If you’ve ever Googled something like “best software for email marketing,” that’s exactly what we’re talking about: The act of starting with a software solution or an example already in mind, and working backward from there.
But Stephen recommends starting with a clean slate.
“In general with communities, I like to advise people not to just see something that they like the look of and copy it,” Stephen says during the introduction of his masterclass.
“You really have to work out: Does this make sense for my community? The whole thing with community automations is thinking about your member experience and how your automations are tying back to that.”
How to identify what you should automate in your community
By identifying the path a new member takes as they move through your community, you can quickly identify some universal patterns.
Those are your best candidates for community automation: the situations that call for a repetitive manual response on the admin side of things (like adding new members to your mailing list), and therefore can be safely automated so you don’t have to handle them on a case-by-case basis.
Some of the most requested automations that Stephen has built and used himself are:
- Building custom, (but automated) onboarding and offboarding flows
- Crafting moderation triggers and review processes
- Setting up milestone and engagement systems for gamification
Stephen says automation isn’t about replacing you (a beloved and charismatic human) with an AI agent (a helpful tool). It’s about identifying the logical order of actions that everyone in your community goes through, and reducing as much friction as possible along the way.
“The only difficulty with automations is working out the order of things, as well as some of the tech stuff that comes with setting it all up,” Stephen says. “But all of that comes with practice and self-learning.”
By identifying the smartest and most user-friendly spots to add community automation, you can continue to grow your audience while still prioritizing your energy where you need it the most. And like every journey, it starts with a single step.
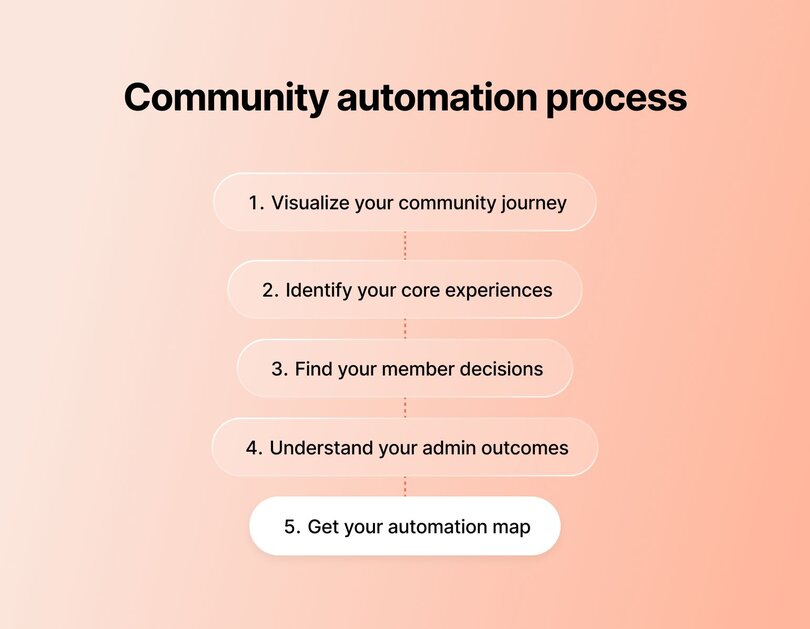
Step-by-step guide to automating your community
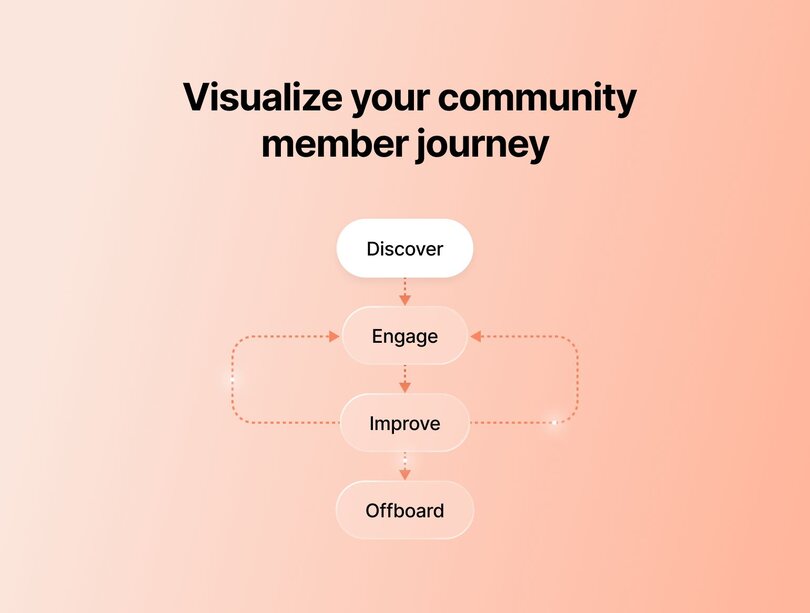
Step 1: Visualize your community journey
Stephen challenges us to flip the script and focus on our community journey before anything else. Begin by asking yourself questions like:
- How does your community help members?
- What does the ideal journey of someone moving through your community look like?
- How will someone new enter your community?
- What happens after they join?
- How do people in your community engage with events and each other?
- Do you personally engage with community members in comments and posts?
Step 2: Identify your core experiences
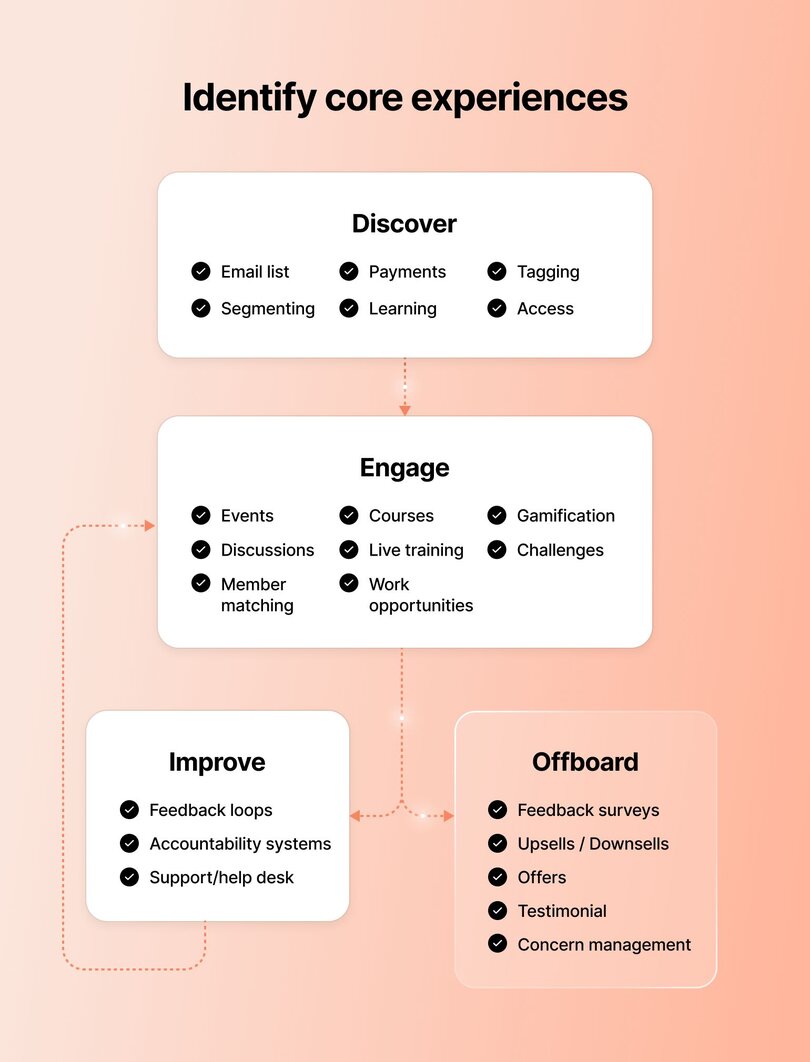
With those answers in mind (take your time, grab a snack), you’re ready to focus on core experiences: The central pillars that everyone in your community will go through, and the main points of value for everyone involved.
Two obvious ones are onboarding and offboarding, but the rest will be unique to your community as a whole. Think of things like:
- Gamification of tasks/interaction within the community
- Regular events, either digital or in-person
- Sharing exclusive content within the community
Every core experience you identify will help shape your Automation Experience Map, so this is a crucial part of plotting the best course for your community members going forward!
Step 3: Notice your member decisions
With your core experiences in mind, we can move to the next step: member decisions. Because each core experience requires your community members to make a choice/perform an action.
Take onboarding, for example: The member decision could be as simple as “signing up by creating a free account,” but could be a multi-step process if they also need to pass a paywall, create a profile, and introduce themselves to the rest of the community.
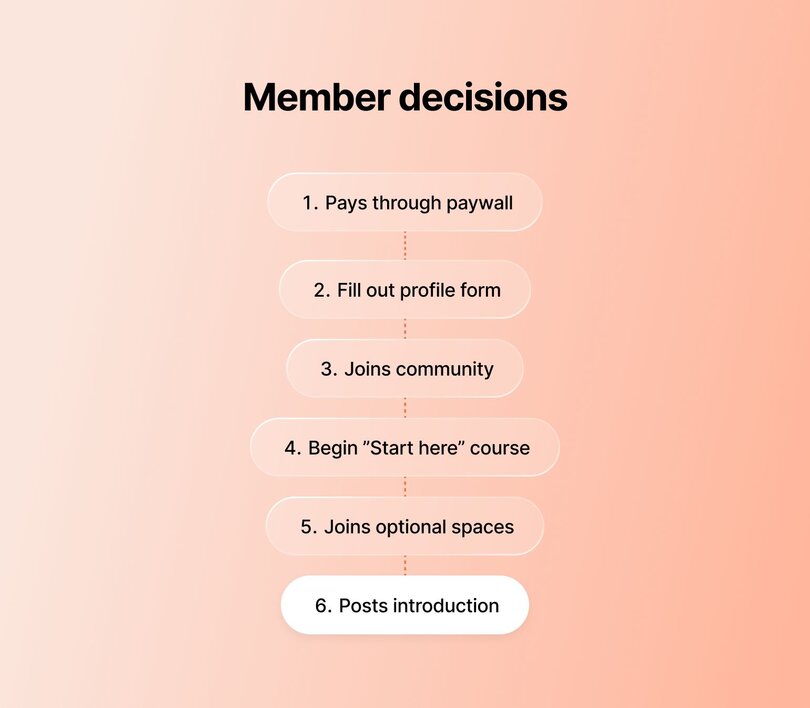
For each of your core experiences, identify the major decisions your members are being asked to make.
👉🏼 Pro tip: Any point of your community journey that can be described as “Member does a thing” is a strong candidate for automation.
Step 4: Understand your admin outcomes
This brings us to the final part of your strategy mapping: admin outcomes. This is where all of those previous steps trickle down to direct admin tasks that you have to manually respond to—making them your ultimate automation goal. If you can automate the admin outcome that is created by each member decision, you’ll officially save yourself time and energy.
To use the example of someone joining your community: If they create a profile, you might need to create a new CRM record for them, add their info to your mailing list, and send them a welcome message.
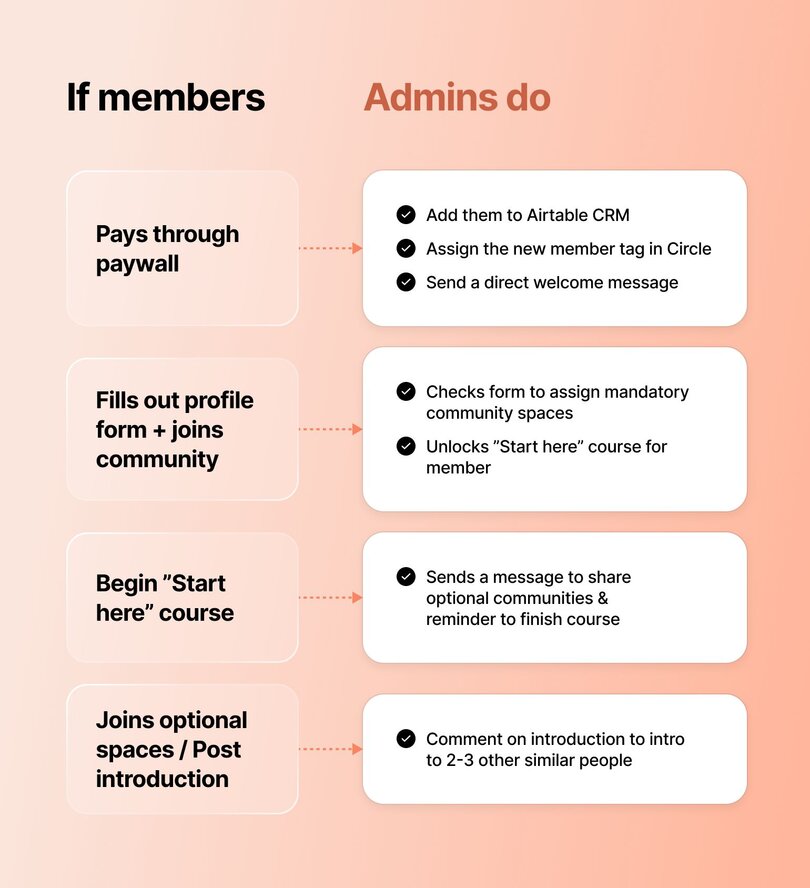
The labor quickly adds up, which is why Stephen encourages you to start by picking ONE thing that you do as an admin every time a member decision is made. This will be another strong candidate for automation, effectively reducing repetition and friction on both sides of your customer journey. And focusing on just one decision-outcome pairing at a time will allow you to start automating without getting overwhelmed.
Step 5: Get (and use) your automation map
Once you’ve matched member actions to admin outcomes, you’ll have a good sense of what your automation game plan should look like:
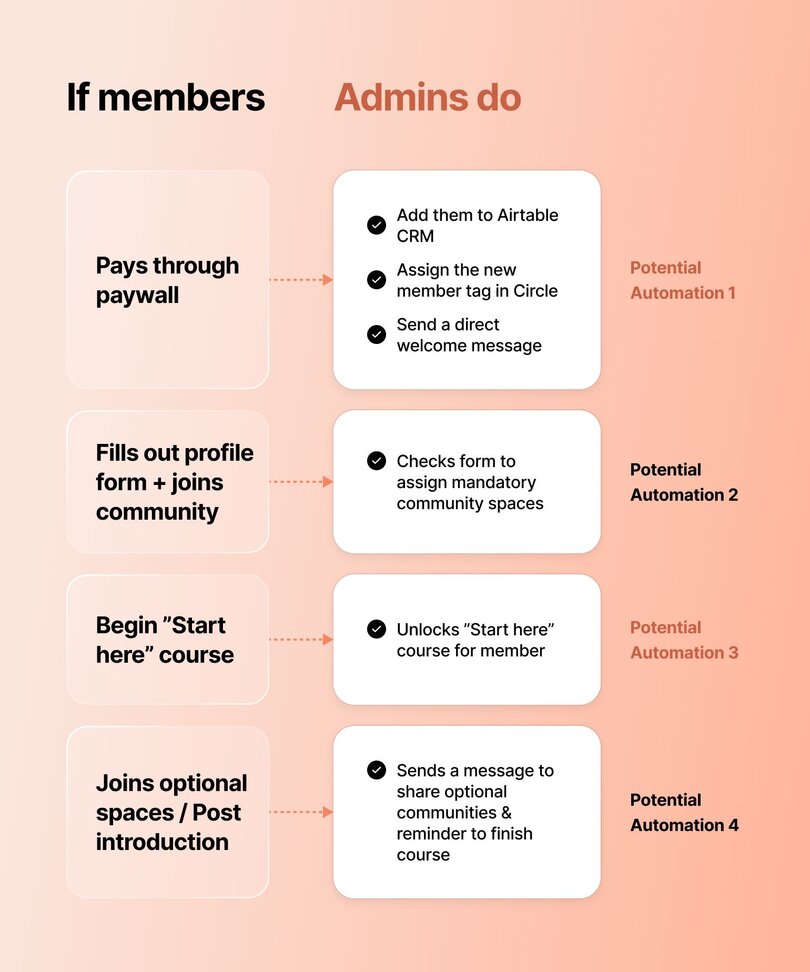
You’re now ready to take your notes and knowledge and move onto the next step: matching your strategy with the right automation tools! If you want to make your life a bit easier, you can also plug your answers into Stephen’s Automation Map Form.
This (fully-automated 😉) tool takes your answers and structures them in a simple visual layout so you can see what could be automated in your community—to help you discover the potential for automation. Then you can use that list as a foundation to start setting up some automations and saving time!
Finding the right tools for your job
The Automation Experience Map you receive (or create) can help identify tools that might be the right fit for your goals.
Additionally, here’s our shortlist of native and nicely integrated tools that play nice with Circle and are designed to handle specific hurdles that community builders face each day:
- ⭐️ Circle Workflows: By identifying the repetitive tasks of your everyday community admin, Circle Workflows helps you automate them into one-and-done processes.
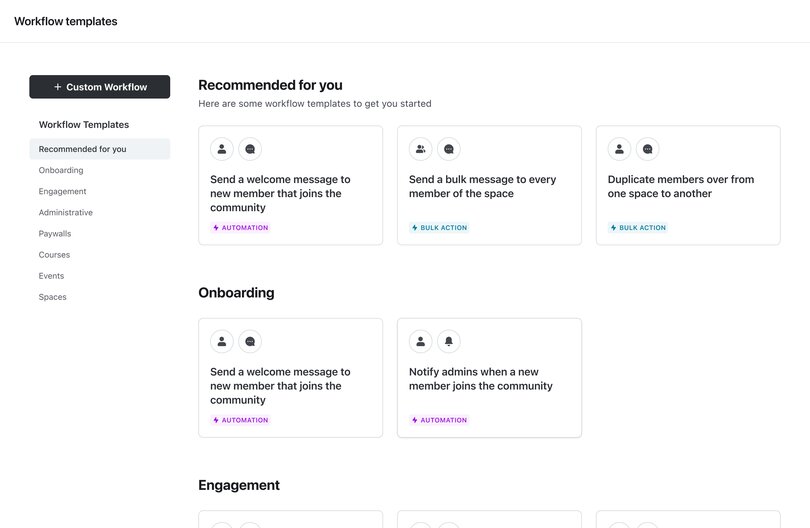
- ⭐️ Circle AI Workflows (new!): For enterprise and Plus customers, AI workflows help you automate responses and actions inside your Circle community using AI by detecting tone, evaluating content, and triggering automated actions like replies or content moderation.
- Zapier: This beginner-friendly tool helps your various apps, tools, and software platforms talk to each other and execute your automations smoothly.
- Tally: A quick-and-painless way to create forms and templates for gathering user information, feedback, and anything else that comes in the form of…a form.
- Airtable: Feed your inner Project Manager what they crave with lightweight, easy-to-navigate organizational tools.
👉🏼 Pro tip: When in doubt, ask Circle Bot! You’ll be able to quickly learn if a shiny new tool or piece of software will fit into your automation plans or not. Now it’s about putting your plan into action. Which brings us to our final point.
The best place to start automating your community
By taking that extra bit of time up front to focus on strategy and dig deep into the needs of your community members, you can move forward with knowledge on your side. But where’s the best place to begin?
This one’s easy: Start with onboarding.
“One of the big things that I think is very important for any situation is getting people used to using the community,” Stephen says.
“Some people do this as a direct message where you’re telling them to go next. Sometimes we’re redirecting someone straight into a course lesson when they join. But it’s all about giving them the information they need in a concise way that isn’t gonna overwhelm them, and gives them one core action to do as soon as they join.”
How to avoid auto-hating while you’re automating
You decided to build a community because you believe (like we do) that communities are the best, time-honored ways for people to truly connect. Automation can help you focus more on that, while minimizing the admin tasks that keep you busy.
“The best advice I can give you is to keep it simple to start with,” Stephen says in the closing moments of his masterclass. “If you’re just launching a community or you’ve only had a community running for less than three months, you just need to have onboarding and offboarding in place so that it’s running smoothly for you. As you gain more feedback from your members, and as you think of cool ideas to add to the community, that’s when you can really start branching out.”
That focus on fundamentals is key, because automation is ultimately like a moving sidewalk in an airport: It quickly gets you where you’re going, but you need to be going in the right direction to begin with! You can easily over-automate your process to a point where you’ve created new time-consuming problems for yourself, and suddenly you’ve taken the moving sidewalk to the wrong terminal as your flight is about to depart.
Stick with the basics, and familiarize yourself with the tools that’ll help you to automate your community journey in a way that feels… Human.
But most importantly? You’ve got this. And I can’t see what you (auto)make with these tools!