Launch your online community in 5 practical steps
Do you want to launch your own online community? What’s stopping you?
For most of us, the idea of running an online community is great, but taking our community from a great idea to launch can feel incredibly daunting.
I’ve helped thousands of community builders and believe me, most people feel overwhelmed in the early stages. Going from no community to launch can feel like a huge leap!
So, I want to give you five practical steps to help you to launch your online community.
Step 1: Decide what kind of community you want to build
Before launching your online community, you need to consider what type of community you want to run. Ask yourself the following questions:
- What is the key purpose of the community? Why does it exist?
- Who is this community helping?
- How will it help them?
- Do you know how many members you want to serve?
- Is the community paid, freemium or free?
- Is it open or closed? (Can people join anytime, or do they need to go through an application process?)
These are big questions, but crucially important.
Running a free community serving 30,000 members is a totally different experience versus serving ten people in a close knit, paid community.
It’s also so important to be clear on your “why.” Why launch this community? What is your core mission?
If you’re feeling stuck with some of these questions, I encourage you to go and explore other existing communities. Take notes on what you like and what you don’t. What resonates? What inspires you? I’ve found it tremendously helpful to learn from other communities over the years.
If you have an existing audience, it’s also invaluable to listen to their needs. I recommend a great little book called The Mom Test to everyone, as it’s a masterclass in how to conduct audience surveys and feedback calls. The book teaches you how to speak less about your offering and, instead, focus more on learning about your audience’s pain points, challenges, motivations, and goals.
We recently did an extensive user survey at my company, using the frameworks shared in that book and it triggered so many great ideas for how to better serve our people. Listening to your audience can give you clarity on how to build the best community for their needs.
A simple framework for how to position your community
If you’re struggling to summarize what your community will be about, try to complete the following statement:
My community helps ‘X people’ to achieve ‘Y outcome’.
Here are some real examples from members of my community:
Mic-Drop Community for public speakers:
We help thought leaders to become must-have speakers
Video for Entrepreneurs Community:
We help entrepreneurs to look and sound great on camera
Sustenance Community for Writers:
We help writers to hone their craft and find connection
Here are some tips to help you to complete this exercise:
- Make it short (think one sentence).
- Make it easy for others to repeat back and remember.
- Make it easy for people to refer (for example, one of our members, Stephen, is launching a community helping community builders with automation. So anytime someone asks me about automation in future, I’ll easily be able to refer to his community).
Step 2: Decide what members you’re serving and validate demand

This step is all about taking your community concept and getting it in front of potential members.
This serves to validate how much demand there is in your community. You can also gather vital feedback about your community concept from the first step.
If you have an existing audience (social media following, newsletter, blog, etc.), then use this to share your community concept.
When I was planning my community, Learn.Community, I shared the concept with my audience. I used this announcement to also start to build a waitlist, where people could express interest in joining the community when it launched. I told myself that I’d only launch the community if we got 100 founding members.
After receiving 400 applications, the community concept felt validated!
If you don’t have an existing or large audience, that’s totally fine. Leverage your network to have conversations with potential members. Ask friends if they know anyone who fits your ideal member persona.
If you don’t have an established audience, consider starting with a more humble launch goal, and then go find those initial members one by one. I’ve seen people successfully launch their community to just five to ten members.
If you’re struggling to find those early potential members, here are some more practical suggestions:
- Tell any past clients and customers about your planned community. Gauge if they’re excited by it or not.
- Share on your personal social channels. See if anyone in your network is interested.
- Find ways to get in front of other existing audiences. Before launching my community, I booked speaking gigs and podcast interviews where I could plug my waitlist at the end.
Tip: If every conversation you’re having about your community is falling flat, this is still useful data! You would rather know early if the market isn’t interested in your community, versus investing tons of time into launching and then getting no sign ups. Try to use any feedback you get—bad and good—to refine your community concept, then retest it through follow-up conversations.
Step 3: Build out the structure for your community

Now you have a strong concept and you’ve hopefully proven some demand. Awesome!
Next, you need to think about how your community will be structured.
My advice is always to start as simple as possible, and then iterate from there. Far too many people add countless community events and dozens of spaces from day one.
Too many events will burn out you and your members.
Too many spaces will confuse early members, and dilute any early engagement happening.
Instead, learn from the conversations you were having in the planning phase. What do you think your prospective members value most?
Build a small number of spaces and events around that.
As an example, at Learn.Community, the core of our early community was:
- Weekly live workshops.
- A space to ask questions.
- A space to get feedback on your community.
It was bare bones, but over time we’ve introduced more things, such as our knowledge base, community course, member-led events, and more.
Start simple, and then expand based on your members’ behavior and feedback.
Step 4: Launch!
Now that your community is built, it’s time to launch.
I highly recommend building a waitlist ahead of launch.
Without this, it can often be a guessing game as to how your launch will go. It’s much better to confidently know how many people are lined up, interested in your community. You could use something like Google Forms to build your waitlist. Or, if you’re dealing with smaller numbers of people, just be in active conversations with them as you approach your launch date.
In the run up to your launch, keep your waitlist engaged by teasing content. Get them excited; build anticipation. Then, once your doors open, encourage people to go and sign up.
Tip: If you do use a waitlist and application form, try to ensure people show true commitment. We recently had a member who wasn’t clear in her application that her community would be a paid community. She had hundreds of people register interest, but when she launched, very few converted, as they weren’t expecting to pay. I like to be incredibly explicit about what people will expect inside the community. In my application form I even let people select which payment tier they would like, to ensure they were willing to pay.
It’s optional, and depends on how many members you’re serving, but I love using a launch party to launch with a bang!
When we launched Learn.Community, I directed our waitlist to a Zoom call on launch day and we shared first access to the community with them live on that call. I used the launch party call to greet those prospective members, answer questions and even gave a tour of the community. It was a great way to have some fun with those early folk, as well as build some great social proof, as they could see how many other people were also on the call, excited to join.
Tip: On launch week, don’t be afraid to ramp up your marketing. We just launched our flagship community course at Learn.Community and rather than my weekly newsletter, I sent out three emails in three days. Each one generated a spike in sign ups. The “last chance” email on the final day of launch was particularly effective. By sending more emails than typical that week, I tripled the success of that launch. Be proud of your community launch and shout about it from every platform you can.
Step 5: Onboard your new members properly
Once you’ve launched, it’s vital to show up and serve those early members.
Your community should include a clear section outlining how members can get started. This could take the form of a series of posts and articles, or even an onboarding course.
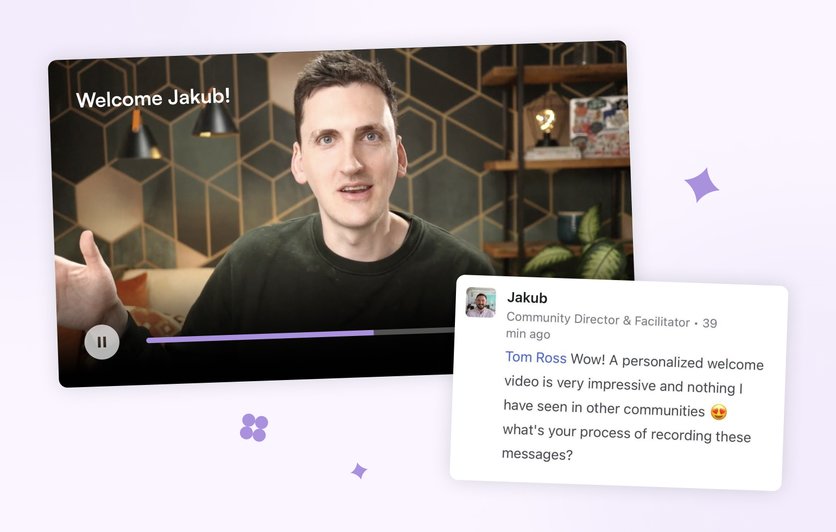
I always like to keep things personal, so if the scale of your community allows for it, consider reaching out personally to new members. A personalized welcome message goes a long way, and helps to engage those early members. I also like to shoot a personal Loom video for each new member, just to add that human touch.
Here’s an example of a recent welcome video I sent a new member, and their response:

Your aim should be to wow these members from day one.
I tend to reach out in a member’s first 24 hours inside our community. In my early conversations with them, I try my best to get them one step closer to their definition of success. For example – if they’re struggling with engagement in their community, I’ll recommend relevant learning resources in the community to help them.
Your community deserves to launch!
If you have a great idea for an online community, I encourage you to launch it!
It definitely takes work to execute the steps above, but it’s so gratifying when your community goes live and you start serving those early members.
You can do this!
Need a little extra help?
If you do need personalized guidance and support to launch your online community, I’d love to work with you. Every member at Learn.Community gets unlimited help and questions with me, as well as support from fellow members. You can join us here.
About the author, Tom Ross:
As well as being a Circle Expert, I write and consult on community regularly. I’m also the founder at Design Cuts (a community of a million creatives) and run Learn.Community, a community for community builders just like you. If you need some extra help launching your community, I’d love to work with you. You can check out Learn.Community here.
Looking to launch your own online community?
Circle’s community platform brings together your members, discussions, events, courses, and content—all in one place, under your own brand. Plus, you get access to our customer community full of handy resources and over 8,000 community builders on the same journey as you.